Friday, November 27, 2009

Doggie Biscuit

Its not the first time I use this recipe, but the 2nd. The first time was a long long time ago. I wanted to bring this biscuit home to malaysia for my little niece and also to find something for my kids to do, so I decided to bake these cute looking biscuits and ask my kids to decorate them. My friend, upon hearing this, like to bring her kids over to "participate".

So here is part of the end result.

I baked double the recipe, because I like my friend to bring home a recipe's portion, but now I ended up with quite alot still at home. The ones in the pictures are done mostly by my friend. Very creative. Those done by the kids .... erm ... :-)

The mixing part is so easy with KitchenAid, keke. Anyway I think this recipe can be done manually by hand too.

The kids enjoyed themselves for a while, but they are too fast for my small oven, and I did not want to use too many trays, so I rather them go play then sitting around the table with oily hands.

So can you find snowman, kitty cat, rabbit, bear bear, etc among the lot?

The recipe can be found at Happy Home baking's website.

狗狗餅可愛嗎?就是因為它可愛,所以想做些拿回家婆家哄小孩,順便我家哪兩個小瓜也可以參與一份。我朋友也乘假期帶孩子來湊熱鬧。圖片里的餅餅是出自我朋友的巧手。蠻容易的,現在就去動手做一做吧。請從這兒查閱食譜。

Wednesday, November 25, 2009

Questions that needed answers

Am copying a recipe down because am thinking about doing it. A question just pop into my mind. Can most batter wait? What do I mean by that?

You see, mine is a small oven that can only fit in a tray of twelve mini cupcakes nicely. What happen if the recipe I am following can make more than 12 ? Should I half the recipe, or should I get two trays? If I bake one first, can the batter wait? Will the waiting time allows chemical reaction to take place within the batter? I am sure some batter can survive the waiting time, some cannot. But I wouldn't know what can and what cannot.

So how?

Sunday, November 22, 2009

Busy but not with ...

Sigh, this time of the year, not busy with my hobbies (unless you call tidying up the household is a hobby of SAHM?) but with spring cleaning. I still bakes, but it is just the same old stuff that use to fill the tummy.

Next year, my son is going to P1, so he has used some letters beads to make his teachers these handphone straps. Of cos, he only did the pattern planning and stringing part while I crimp all stuff proper for him. I hope the teachers are happy.


Saturday, November 7, 2009

Black and white

Have not been baking for a long time .... cannot remember for wat reasons .. but here I am, with two recent bakes done last week and last last week.

The first is an easy Banana Chocolate cake from 手拌式蛋糕by Kevin Chai. I had very ripe bananas (so ripe that they fell off from the "don't know what to call". :-) . I am not sure if I failed or suceeded (but I baked it more than the time required), because the inside of the cake is so moist (or should I say wet) that it almost look like mud cake, or those super fudgy brownie? You see and you tell me.
The cake rises very well in the oven and it requires "tent-ing". However, after I removed it from the oven, it sank after a while. As it is a loaf cake, and I do not have a oven thermometer (my oven is very temperamental, haha) so I am worried that it will not be baked. With the aluminium foil tent, I purposely let the cake bake another 15 minutes more than the required time, so I hope the "wetness" is normal. Anyway my kids love the cake, I do too.

Look at that sunken "face".


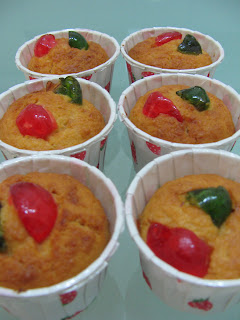
Shortly after this bake, I remember my parmesan cheese is expiring soon, so I dig out the recipe that I had prepared long time ago ( I knew I would not be able to finish that tub before the expiry date). I followed the recipe and has Mini Cheese cupcake done with my girl in a morning. Pretty fast and fuss free, but the recipe isn't really complete because I did not jot down the temperature that I should bake the cupcakes in, so I just use any reading. Anyway, the parmesan cheese has passed its "Best Before" date (not expiry date), but I still went ahead to do it .. and eat it too! Its yummy, but oily. When they are in the oven, there are already alot of oil oozing out. My kids also love these and requested me to bake again. Look at the molehills.
and this "sunflower"
and the yummy inside.

I think I should learn from Happy Home Baker .. use more pictures, less words, esp when my command of english isn't very good. Now I am so tired to write in mandarin .. so this post will not have the mandarin part.

Here is the recipe.

Banana Chocolate Cake

Ingredients
90g SR flour, 90g plain flour
1/4 tsp baking powder, 1/4 tsp bicarbonate soda
1 1/2 tbsp cocoa powder, 170g butter
1 tbsp corn oil, 150g chocolate
100ml hot water, 80ml milk
170g brown sugar, 3 eggs
200g banana flesh (sliced)

Method
1. Grease and line 10cm by 32 cm (4 by 13 inches) baking tin. Preheat oven to 170 degree celsius.
2. Combine flours, baking powder, soda and cocoa powder in a mixing bowl.
3. Melt butter, oil, chocolate, hot water and milk over low heat. Remove from heat, combine with brown sugar and eggs.
4. Stir egg mixture into flour mixture together with banana slices until well blended.
5. Spoon batter into prepared tin. Bake in oven for 40 - 45 minutes or until cooked. Stand for 10 minutes and turning on to wire rack to cool.
6. Decorate with decogel, banana slices and chocolate chips.

I have forgotten where did I get the mini cheesecake recipe from, so if anyone wanted it, do email me and I shall share it with you.

Now I really need to zzz...

Friday, October 2, 2009

Busy with beading

The kids had chicken pox, then I had chicken pox, and I am told to avoid food like egg, chicken, peas etc for minimum of a month.. so without eggs, I did not bake, just too lazy to find non egg recipes. So I spent some time on my other hobby, beading.

I feel that the previous earring that I made is not dainty enough due to the big loops, so I cut them up and made another pair.
Pearly Black Drops

Besides this, I keep bumping into ladies wearing earrings with a single pearl... that reminds me of the peach fruit, so I made a pair with my pearls and I added a green crystal to each pearl to symbolise the leaf. I do not know how to comment on this pair, but I think just a simple pearl, but bigger would be very nice. Simple is always nice.

Fresh Peaches

Besides doing something for myself, while reading the princess magazine with my girl, I have got an inspiration from a necklace clipart and made this bracelet for her. She is so happy and this is her new favourite.

Sweet Ivory

I hope I will find a time to get some supplies .. I wanted to make another necklace for myself.

Oh .. I miss eating cakes.

Wednesday, September 9, 2009

A matching earring for my pearl sandwich necklace

I have the intention to wear my "sandwich necklace" for a wedding coming up in Nov, so it cannot go with my current silver earring. I do not intend to have a pair of earring that looks the same as the necklace, so I just use the same colour theme and I match the pearl (that I used in the necklace) with a black drop bead. Here goes :-


Not very satisfied, but will do for the time being. The loops are too big, thus seems to make the earring "very empty" (wonder if you will understand). I do have one or two other variation in mind, but has no pearl pressence. So if only black, wonder will it be seen when my hair is hanging down.

p/s : Can you see the flaws? (the difference size of the loops is a big giveaway, not counted)

Tuesday, September 8, 2009

My third loaf from Breadmaker


To use up the frozen pandan juice, I made the pandan bread again. This time I used the new brand of yeast, use pandan juice instead of coconut milk and remember to add pandan paste (instead of essence, because I don't have).

Normally, with my skills, I do not venture far from the recommended recipe, but this time, I just want to use up all the frozen pandan juice. With the new yeast, my hubby says there is still a slight hint of sourness .. anyway I did not detect anything.

This time, the bread is softer than the first try. Not sure if it is due to the egg. My kids are having chicken pox, so cannot consume any eggs, thus I just empty the whole egg into the mixer bowl, a total of 46g instead of what is asked for. The bread looks bigger as compared to the first time too. However, I just can't seem to get a smooth top.

By the way, anyone know what is the difference between pandan paste and pandan essence?

你認為我做麵包上癮了嗎? 不是啦。是我懶。用麵包機做麵包,就好像煮一鍋熟的餐。全部材料倒進去,開機,按鈕,等三小時,就有麵包吃了。這次沒用椰奶因為想用完椰水。 蛋也多過食譜寫的。這次的斑蘭麵包比第一次來的軟,也比較大。新鮮的麵包一定好吃的。

Saturday, September 5, 2009

My second loaf from the breadmaker

Happy with the first loaf, I continued to make the 2nd loaf. This time a chocolate flavour one, because it is my boy's favourite. I took the recipe from HappyHomeBaking again, Chocolate Hazelnut Bread.

She mentioned in her post that she bought the wrong type of hazelnut (grounded instead of chopped) but I like to use grounded hazelnut because I know that my family (accept me) cannot accept a bread with nuts.

Previously, I am using Red Man Yeast but my hubby thinks that the first loaf that I baked has a hint of sourish taste, so I am determine to change the type of yeast, from RedMan to Bake King (since it is readily available at the nearby NTUC).

This Red Man breadmaker only allows me to choose the crust and type of bread, so basic and light crust is what I have chosen, thou I know the crust will turn out not light!

At the end of 3 hours, I got this.


I love the look of the bread, the inside but not the outside. I still do not have a smooth top. Is it the standard for breads out of breadmaker? The bread is still soft, but the crust is cripsy then when cooled, chewy. Anyway I love this bread. The chocolate inside makes it so tasty and I love the little bits inside. My girl ate it while it is fresh and said is nice, hubby also say its nice (but he doesn't like the bits), but my boy got chicken pox and has no appetite. Anyway, on 2nd day, no one asking for it. it is a little drier.

According to the manual of this breadmaker, the liquid ingredients will go first follow by the dry ones, then butter, but this recipe calls for melted butter and it is liquid ... so shd it be first, or last? In the end I put it in last, since i m going to turn on the maker right away.

It was after that then I realized I may have added the hazelnut in the wrong order. Hazelnut can be considered as "other ingredients" that should only be added after the 2nd kneading, but I put it in together with the dry ingredients. I wrote to ask HappyHomebaking for advices. She mentioned if the hazelnuts are grounded to very fine, I can add in with the flour. If it is in bits, adding it too early might make the dough dry as it may absorb up the moisture. If I ever had the chance of baking this bread again, I hope I remember to add the hazelnut in later.

很高興上回的麵包不錯,所以乘勝追擊,再來個巧克力口味的。

Friday, August 28, 2009

My first loaf from the bread maker

This breadmaker is not a new addition. My mother bought it from Phoon Huat many months ago. Today is the first time I use the machine.

My girl is the only person in the family who likes pandan bread (I eat any flavour thou) so instead of buying just for her, I used this chance to bake one for her since I have the pandan juice. I followed the Pandan bread recipe from HappyHomeBaking's blog. I only have 50ml of coconut milk left over from my pandan chiffon cake attempt last week, so I top up the rest with pandan juice (extracted from pandan leaves on my own). I just happily dump all the required ingredients into the machine (mum helpped too), let the machine do some mixing before I stopped it to do some scrapping of the ingredients off the wall of the bread bucket. Then I choose the option for basic bread and light crust, and waited patiently for 3 hours and this is what I have got.


The bread does not have a nice uniform shaped top. Could it be due to the size of bread (using only 250g of flour). After slicing it up, I still think the crust is a little thick. The green colour is not nice, and not much of pandan smell (unlike the bonjour brand pandan bread). See! Anyway I forgot to add in the pandan essence.


The bread texture looks good in the picture right? The bread is ok, but it just doesn't taste like the gardenia bread, or bonjour bread, or even sunshine bread. Those commercial bread are soft and when you tear a slice, you feel like tearing cotton wool, doesn't require much effort. However when I try tearing this homemade one, it is like tearing cheese .. you will feel some pull (if you understand what I mean). Nevertheless, the bread is still soft and fluffy. I wonder how it will taste tomorrow morning. As for the taste test, this bread only passes my girl's. My boy says yucky and the daddy finds that it somehow a slight hint of sourish. I think I need to change the brand of yeast.

Now that I finally tried making bread , I think I gonna find more of such simple bread machine recipes, like chocolate, nutella (from happyhomebaking website) flavour etc.

我終於烘焙麵包啦。成品不是很理想。可能是麵包太小了(才用250克粉)外觀有些怪異 。皮也厚了點。用了椰奶和班蘭汁取代牛奶,但口感對我而言还不錯,當然不能比美外面賣的。期待下次的嘗試。

Thursday, August 27, 2009

Chocolate Cheese Cake the 2nd

Last sunday was my granny's birthday. No, I did not bake the birthday cake, my "Kungfu" still not there yet, but I baked a cake to add to the list of existing food. I had no confidence that the cake will make it, so I did not tell my relatives at all. Finally, after much meddling with that new baby, I got an 8" by 8" product.

I used alot of time making this cake because I can't decide if I should use the K beater or the wire whisk. Finally, I choose the K beater. Since I only have one beater and one mixer bowl, I have to wash after I cream the cheese part. When I am about to start my cake batter portion, I realise my SR flour has expired and I have to google for a substitute and finally settled with mixing baking powder and plain flour. The "formula" that I used is to add 1 and a half teaspoon of baking powder to 140g flour to make 140g of SR flour. The recipe called for 120g flour, so I just estimate and mix. I also, out of convenience, reduce the butter by 6g. I also used icing sugar for the cheese mixture rather than caster sugar.

The outcome? The cake has many bumps on the surface, not sure why. It did not rise alot, and I tent it throughout after half the baking time because it is chocolate cake and it is difficult to see if the top is burnt. Since it is for other's consumption, I think I want to see how it taste before letting other people eat it. So I tasted a corner. The chocolate part is rather dry, but the cheese part is defnitely super yummy.


After the gathering, I brought back an empty container. My 2nd aunt took the remainders. All of them who ate said they love the cheese portion and said the same thing "the chocolate part is dry".

My kids did not get to eat any (besides the little bit of sampler) so I baked for them again the next day. This time I use SR flour with the right amount of butter and it resulted in a cake with very moist and soft chocolate part with the same super yummy cheese part. I gave some to my boy's classmate's mum and she also said the cake is very yummy.

The whole cake is gone on the 2nd day. I think the chocolate part taste close to Sara Lee. Wonder if I can just bake the chocolate part portion and "serve" as Sara Lee to my kids. They have finish 4 boxes of Sara Lee this month.

Cake made from SR flour. Rises better.


Changes on the pandan cake

On the 2nd day when I wanted to eat the pandan cake, I noticed there is layer of moist sticky green layer on top of certain parts on the slices of cake. I wonder why is this happening. It happens to the pandan muffins too. See.


Anyway I proceed to eat them and there is nothing wrong with me after that. There is no foul taste or smell too, so I think the cake has not turned bad.

Anyone out there to explain?

Saturday, August 22, 2009

Much awaiting Pandan Cake

I have finally baked the pandan cake, with the help of my new baby KitchenAid mixer. Here is the new baby.


I only use it to beat my egg white. Quite happy using it, and most importantly, the sound from the mixer is quite soothing and not too loud.

I used the same recipe again (this is my 4th try) and I take note to save some for cupcakes since my pan is smaller. I can't remember if I should mix the egg white into the egg yolk mixture or other way, but since the mixer's bowl is bigger, I mix the yolk mixture with the egg white mixture. Not quite used to such a big bowl, so I took quite a long time to mix both mixture together. As I blend, I see bubbles popping away.

After the cake went into oven, it rose very high roughly after 5-10 minutes, then as the time goes by, it rose and it started to crack. The final product after 45minutes is a pandan cake with a very explosive top. As usual, I use the lowest shelf and tent the top. I had to go out after the cake and the cupcakes are baked, so I troubled my mother to unmould for me when the cake is cooled, so I did not see the whole cake but the pieces that she already cut. This is how it looks.


As it rose so high, the condensed part at the bottom is expected. This time the pandan cake has bigger holes than the 2nd try (I did not have any cross section picture taken in the 3rd try). I find the cake very moist, unlike those sold in NTUC, but hubby say he like this better as those sold in NTUC are pretty dry.

This time the top is not evenly browned. It seemed to have a "vacuum" at the bottom of the pan, that is why the top seems to have sunk. This also happens to all my pandan cupcakes. Their bottoms are concave. I have 3 more packets of coconut milk. I hope to try again real soon.

買了個新攪拌器,用它做了pandan 蛋糕。 我还得一段時間才能習慣那又大又深的mixer bowl.
在烘爐里,蛋糕發得很厲害,蛋糕頂嚴重“破裂”, 但 裡頭其他部份,那些小洞洞,还真像外邊賣的。期待第五次的製作。

Thursday, August 20, 2009

The 3 rings

I have made 3 rings recently. My friend just signed up a beading course and now that I have kaki, I have more motivation.

I shall call it "Brown Square in the ring".

I shall call this "Simply Purple".

For the moment, this will be "Rollie Pearlie".

The first and last ring was made by following instructions from the library book that I borrowed (Beautiful Beaded Rings). The 2nd ring was made following an online tutorial from here. I usually do not wear these accessories, esp after my kids are born. I like to make them though. Soon I will have lots of end products.


Wednesday, August 19, 2009

Finally - after almost half a year

Finally what? Finally I baked the peanut cookies that we usually eat during CNY. Before the CNY, I am so busy with cleaning, then CNY came and gone, then all those post of CNY cookies made me want to try baking them. After so many reads, I finally understand that peanut cookies are the easiest of the lot so I went ahead to buy peanut powder. That powder has been patiently sitting in my cupboard for roughly 5 months before I finally found time to do it.

Yesterday, I still can't get my cake flour from NTUC (trying to use it on pandan cake), so I use the time to make the peanut cookies. Thou it is easy, but I still took ard half an hour to mix the cookie dough. Perhaps my mixing bowl is too small, so I must stir slowly (excuse!) and also I did not use my hand till the very last 10 minutes.

Then I follow the "mineral bottle mold" method and has a whole 9" by 9" tray of cookies. I put them in without the egg wash (forgetful) so I took them out 5 minutes before the stated time (20 minutes) and do the egg wash. I bake then alittle longer than 20 minutes and took it out. Another smaller batch went in with the egg wash and I purposely baked it longer cos I feel that the 1st batch doesn't have the colour. In the end, they are quite brown!

As usual, my kids do not fancy the cookies, and half of them went down my stomach already. Luckily this recipe only uses 100g oil (excluding the peanut fat). I guess it might be better than eating alot of brownies.

The lighter ones are the first batch.
The first batch out from oven, so neat. :)

I followed the recipe from Florence's blog with some amendments (cos I ran out of icing sugar). I only had 38g of icing sugar, so the rest is compensated by caster sugar. Sweetness is still acceptable, perhaps cos I reduce the total sugar by 10g. Besides that, I just use the sunflower oil I used for cooking.

拖了好久才嘗試了華人過年吃的花生餅。要不是超市沒有蛋糕粉,害我不能嘗試pandan cake,那包花生粉肯定放到過時。做法不難,花的時間不久,大家不妨嘗試嘗試。我用的食譜來自Florence's的部落格


Sunday, August 16, 2009

My first - baked potato chips

I think this is my first and should be my last try of baking potato chips. Either Woman's weekly or Simply Her has a short note on how to bake our own potato chips. Since I have russet potato at home and did not want to make soup with it, I use it to try baking my own chips. Actually I tried two times.

The first time, I painstakingly slice the potato as thin as I can. Then I dry them with kitchen towel, every single piece, then toss them in olive oil and salt, then I lay them on foiled paper baking pan, then into the oven. I do not have a oven thermometer now, so I just turn the knob happily. I watch the potato slices patiently (got all the time since I am not cooking). I see them shrink into small pieces, then it started to turn brown. I feel that they are not crispy yet, so I "oven" them a little more, and wanting to hasten up, so I thought grilling might be faster! So after the grill mode for less than 2 minutes, the chips all turn chocolate brown (instead of golden brown). I still took a piece to taste. No bitter taste thou, proves that it is not completely burnt yet, so I happily finished all the chips) and that small little amount (sorry no pictures) came from one potato only.

The kids are not happy that I did not deliver the potato chips, so they wanted me to make another time. So this time, I sliced it thicker, ard 2mm each slice. I wanted to try what would happen if the slices are not dried (I thought dried slices would result in crispy chips, hmm actually lazy to dry them piece by piece too) , so I just drain dry and toss with olive oil and salt. I also happily turn the oven temperature knob and keep watch carefully. The chips finally turn brownish (at some parts only) after more than 30 minutes. About half of them are still too burnt for the kids to eat, so those went into my tummy. The rest, I split them into half, sprinkle on some Mcdonald's seaweed shaker powder and the kids gobble up in no time (all thanks to the powder I think).

The chips are still not as crispy as those sold outside, perhaps only deep frying will result in that? But I m not going to do that, cos I don't want to clean an oily kitchen. The kids said they love it and ask for more. Anyway, it is really hardwork (cos I am a lazy mum) to produce that little amount of chips (The potato slices really shrink well!), and the time taken to wait for the slices to turn into the chips is a little too much.

Now that I see the amount of chips produced from one potato, I can't imagine how many potato I have eaten whenever I finish a big bag.

Here are how my baked potato chips looked like.

The two different "classes"
The better looking ones closed up


雜誌刊登了一小則自制薯片的方法,剛巧家裡有材料,就姑且一試。第一次,很用心切薄片,一片一片抹乾,加油和鹽,也盯著烘爐,但太急了,火候一時太大,都燒焦了。孩子不甘心我沒給薯片他們,所以吵著還要我再嘗試。我這次就懶了。馬鈴薯片切厚點,只是瀝乾水份,加油和鹽,就送進烘爐。花了好些時間,終於看到薯片開始縮小,變金黃色。可是,我又怕不熟,多等了幾分鐘,結果有些烤焦了。看到圖片的兩堆薯片嗎?一堆孩子的,一堆我的。一粒馬鈴薯就出那一點兒薯片,可想每當我吃完一包,我一共吃了幾粒馬鈴薯!

Friday, August 7, 2009

More simple beading

Just completed what I intended to do for a long time. More bracelets for my girl. Isn't this candy pastel coloured one sweet?

Then I see another simple one from a library book I borrowed some time back. I did not note down the author and title, so cannot give credit here. The book just gave me the idea to match my bungle beads with seed beads to make these bracelets that looked like bangles.


They look pretty nice on my girl's hand, so I made some for myself.
Just for the record. My girl required 18cm of the elastic band, while it is 20 cm for me.


My friend has just signed up a beading course .. so lets hope with motivation from her (she keep making and making and making), I can also shorten my "beading to do list". Of cos, I should be starting my baking soon, since I already got my mixer. Time .... all I needed is time.


Sunday, July 12, 2009

I cheated again


What are these ugly chocolate rings? Did they scare u? They are donut when I asked my kids. They called them "Mummy's donut". I woke up early to make these so that I can utilise the leftover rings of lite meal buns I have. What happen to the centre of the "donuts"? I use them to make "Mummy's swensens burger" that look like the below.


一物二用。我用了Gardenia Lite Meal Bun 的麵包,做了孩子的早餐和晚餐。麵包中間切割出來做漢堡,傍邊拿來做甜甜圈。難看的甜甜圈沒吓着你吧?對不起,請多包涵。

Friday, July 10, 2009

Bracelet and muffin


This bracelet is made for my girl quite sometime ago. Wasn't quite in the mood and busy and lazy to blog about it. Had too much thin jump rings, so hoping to find more "projects" to use them up.

More recently, I finally baked. To be exact, its on Tuesday night. I have bought all the dessicated coconut long time back, all ready for a 2nd attempt since the kids complained I bake too little during the first attempt. This time I tired using butter, but manual creaming. The muffin did not rise alot and still pretty firm. Perhaps I did not cream enough, hands tired.

Anyway, I still love it and ate quite a few. I just love the feeling of the muffin when I chew in my mouth. Its like eating the filling of the traditional coconut tart, just the whole mouthful of coconut taste. Yum!

Here's the miserable looking muffin.

攪拌器還是沒買,所以我再次做椰絲小蛋糕。這次用了牛油但成果還是一樣,一樣好吃啦!嘻嘻。
嗯,順便解釋一下,另外那兩張圖,是我做給我女兒的。隨便做,目的是想用完某個材料罷了。


Monday, May 25, 2009

Mermaid necklace

Mermaid? Not me, but the name of a necklace that is found in a book I borrowed from the library long time back. My little girl fancies Ariel, so she asked for this necklace (actually a part of a three strand necklace) to be made for her. However, it is not easy to get the identical beads so I have to find similar ones from my "collections". After stringing it, I put it aside for a long time before I finally finish the clasp, because I can't decide how long should this necklace be, and I am not sure if it is suitable for a 5 year old. Anyway, after dragging for so long, I just decide to close it and complete the task. There is still another WIP item. Here's the necklace.


美人魚是我女兒喜歡的公主。好久以前, 她從圖書館借回來的書上看到這條項鏈(其實這只是一部份)的名字叫美人魚,就吵著要。我從我的“珠堆中”找了接近的珠子串了給她。真想不通,才五歲的小女孩,怎麼會那麼愛美。

Dessicated Coconut Muffins

Finally I baked something. Saw from Esther's blog that she did a dessicated coconut muffin. The original recipe that she refers to uses butter, but she changed it to sunflower oil instead, so I thought, there shouldn't be a need to cream the oil, so I went ahead to make that. Moreover, bakes with coconuts are among the top of my favourite foods.

Since it is just stir and mix, nothing very special to note. My girl helped me with it and it was done in the morning easily. I did not have evaporated milk, so I used my fresh milk. This recipe produces a small amount of muffins, just 6 for my size of muffin cups. There isn't enough to go round because it is very yummy. My kids like it as much as I do and complained that I made too little. I promised them I will make this again after I buy more dessicated coconut (I hope tomorrow). However the muffins are not the fluffy type. I added the cherries as decoration since they are lying around for sometime. Here are the muffins.
 
 
看到了嗎? 終於有新鮮小蛋糕出爐了。跟著esther的好介紹,我烘了這個椰絲小蛋糕。過程簡單,因為沒用牛油而是用葵花油,所以沒用攪拌器打發,只是稍微攪拌,沒一會兒就有一陣陣的椰香。孩子們都很喜歡,可能物以稀為貴,因為只有六個。凡是又椰子成份的食品都是我的最愛。我要趕快去添購椰絲再做因為我還沒吃夠。

Monday, May 11, 2009

Copycat

Perhaps I should change my blog name to "copycat housewife" since I often take recipes from other food blogs to use (I do give credits).

This time, Happyhomebaker shared a video on how omurice is made (see the video in her pretty omurice post). I always have problem wrapping omurice. It will be flat and contained very little of rice only. Or I will just line a bowl with an egg omelette, stuff the rice inside, cover the rice with the omelette and invert it onto a plate, then slit the top. With this video, I somehow managed wrapping up quite a big portion of rice and managed to have it on the plate with little spills (or rice). I did not shape my omurice though and I think the egg is overcooked. Here's a look.


I hope to bake the coconut muffin in Esther's blog real soon because like her, I am also like stuff with coconuts.

我沒有創意的,只會直接從別人網站參考食譜,就烹煮。我不是不要改而是不會改,而且那食譜已tried and tested,好看又好吃,所以何必呢?這天,多謝Happyhomebaker找到的video,我才能把這日式的蛋包飯做好。以前總是薄薄的,現在總算能飽一餐。


Wednesday, May 6, 2009

Blog is not dead.

One of my friend commented that I have not been posting in my blog. Not much mood when the mixer is dead and I have to wait till GSS to get a new one. However, she cannot see the pictures I share in FB, so I have decided to put them up here for her and to "clock" up the time till the next baking post. These are dishes that I have cooked for my family and kids these few days. Some of the dishes are from cookbooks that I borrowed from the library and some of them are dishes that other food bloggers have done. For example, the idea of salmon furikake lunch is from Happy homebaker, of cos hers is done up much better (see here) . Here goes :-

 
Sugar snaps overcooked!
 Colorless!

 
the all time favourite spagetti topped with parmesan.


Must put up both pictures thou same stuff, else kids will ask why isn't his's/her's there.

上几個blogpost沒用中文寫,其實是忘了。哎,老了。
這裡附上我為家人和孩子煮的些家常菜。一位朋友沒法看到我在FB shared的這些照片,所以利用這個空間。這也好,若有朋友來訪,不至於看舊聞。我的攪拌機死了,所以沒烘焙一段日子了。我看我得去翻我那本“手拌式蛋糕”了。快點來啊。


Thursday, April 16, 2009

No cakes and biscuits, more bread?

*sigh* .. my mixer died on the day I used it to bake a cake for my boy. I am creaming the cream cheese and sugar when I see black specks on the cheese, so I stopped the mixer immediately. While trying to place the mixer on the table, a ball bearing dropped out. I straight away declared the mixer beyond repair. 

However, this cake I am making is for my boy's birthday .. so with the kid's expectation and to prevent disappointment ..  I made the cake using hand power. He asked for cheese and chocolate, so due to busy schedule, I did not want to try something new thus I use the tried and tested recipe. As this is a birthday cake, I am happy that I can finally use up my whipping cream to make chocolate ganache so that my boy can decorate his own cake as he has requested. I just melt the couverture chocolate buttons (finally got rid of this pack too) in the whipping cream and milk mixture over small fire and then when cooled, pour over the cake. 

Here's the output (sorry for the uneven terrain on the cake). The boy decorated his cake with the only easy ingredient available - m&m minis.


 Sorry for the untidiness.

Now that the mixer is gone for good ... should I start utilising the bread maker instead?  

Search This Blog

Visitors since 7th June 2008

Total Pageviews

Followers

Note to self

Blog template changed and blog customised on 20th October 2011